Feb, 2016
Why am I seeing Auto-Cache Engine timeout errors?
Table of Contents
The Auto-Cache Engine uses the WordPress HTTP API to make requests for verifying your XML Sitemap and auto-caching the pages defined in your sitemap. Timeout errors occur when a request does not complete within the allotted timeout period. The default timeout period for HTTP requests in WordPress is 5 seconds (5000 milliseconds). Timeout errors are not uncommon and there are many reasons you might see a timeout error, however the most common causes are network congestion and high server load. Timeout errors usually resolve themselves on the next request attempt, however if you are frequently seeing timeout errors that could indicate an issue with your server.
XML Sitemap Timeout Errors
If you are using the Auto-Cache Engine and you receive a timeout error on the Dashboard, it probably looks something like this:
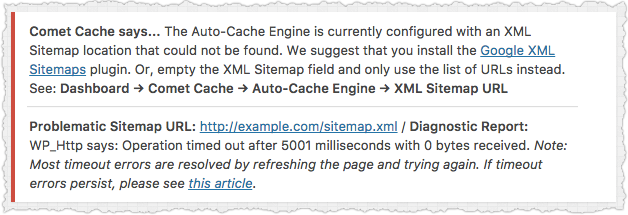
This error indicates that Comet Cache was unable to fetch your XML Sitemap within the timeout period. Comet Cache needs to be able to access your XML Sitemap to know which pages on your site it should auto-cache.
When the Auto-Cache Engine is enabled, Comet Cache will verify that it can reach your XML Sitemap each time you refresh the WordPress Dashboard. If you see a timeout error related to the XML Sitemap and then the error disappears on the next page load, that indicates that it was a temporary glitch, i.e., nothing to worry about. However, if you see the timeout error frequently, then your server may be under a high load.
If you constantly see the XML Sitemap timeout error and you are certain that the Sitemap URL is reachable, then you can try increasing the WordPress timeout as described below.
Auto-Cache Timeout Errors
If you are seeing timeout errors in your wp-content/cache/comet-cache/cache/cc-auto-cache.log file, they probably look like this:
Time: Mon, 01 Sep 14 22:25:50 +0000
URL: http://example.com/2015/hello-world/
Error: Operation timed out after 5001 milliseconds with 0 bytes received
An error like the one above indicates that Comet Cache was unable to connect to the specified URL within the timeout period. As mentioned earlier, this isn't entirely unusual. If Comet Cache was unable to auto-cache the specified URL because of a timeout issue, it will simply try again the next time the Auto-Cache Engine runs.
If you are seeing many timeout errors in your log file, that could mean that you have many posts and your server cannot handle frequency of requests being made by the Auto-Cache Engine. In this case, you can try increasing the Auto-Cache Delay Timer: WordPress Dashboard → Comet Cache → Plugin Options → Auto-Cache Engine → Auto-Cache Delay Timer
If adjusting the Auto-Cache Delay Timer does not resolve the issue, you can try adjusting the default WordPress Request Timeout as described below.
Adjusting the WordPress Request Timeout
If your server is often under a heavy load and triggers timeout errors frequently, you can tell WordPress to increase the timeout period slightly using an MU-Plugin. This will change the default timeout value for all WordPress HTTP requests. You can try adjusting this value slightly to see if adding a few seconds fixes the problem entirely.
Note: We do not recommend increasing this by very much. If you set this to 30 seconds, for example, that will cause your WordPress Dashboard to wait a full 30 seconds before giving up on a request. If you have many requests that take a long time, this could slow things down considerably. If requests need more than 5-10 seconds to complete, you need to address the root cause of the issue: your server. Please contact your web hosting company if you continue to have issues with timeouts.
Create the following directory and file:
wp-content/mu-plugins/http_request_timeout.php
<?php
add_filter( 'http_request_timeout', function() { return 10; /* seconds */ });