Feb, 2016
How to Use RAM (Memory) for your Cache Directory
Table of Contents
- Prerequisites
- Is RAM going to make a huge difference?
- How will RAM make Comet Cache even faster?
- Instructions: Put RAM to Good Use
- Step 1: A quick review of /dev/shm for Linux
- Step 2: Determine Absolute Path to Base Cache Directory
- Step 3: Disable Comet Cache Temporarily
- Step 4: Partition Shared Memory (tmpfs) for Comet Cache
- Gain root privileges.
- Define your base Comet Cache directory.
- Define the /cache sub-directory.
- Wipe the cache; i.e., remove directory.
- Recreate the cache directory to start fresh.
- Configure RAM-based tmpfs partition.
- Mount the RAM-based partition.
- Check statistics; i.e., a quick review of what you just accomplished.
- Step 5: Re-enable Comet Cache
- How do I know it's working?
So you took the plunge and decided to get a dedicated server or VPS that has plenty of RAM (memory). Good for you! In this article I'll show you how to let Comet Cache & WordPress access some of that extra memory. You can use it to improve performance and make WordPress even faster!
Intended Audience: This article is aimed primarily at site owners who are running their own server and who are comfortable with the command line. The instructions provided in this article require at least some familiarity with Linux. If you don't have the skills to complete these tasks yourself, you might consider showing this article to your hosting company and request their assistance.
Prerequisites
- Linux: A dedicated server. Or, a VPS with root access.
- You'll need some time to read over this article, plus 10 minutes to set things up.
- You'll need to have SSH access to your server and be somewhat comfortable at the command line.
- Or, you'll need to show this article to your hosting company and request their assistance.
Is RAM going to make a huge difference?
The answer is almost certainly yes.
If you're on shared hosting, a dedicated server, or a VPS; and your server has an optical drive (quite common), you're going to benefit greatly from the details provided in this article.
If your server runs an SSD (solid-state drive; aka: flash drive, digital drive), you will benefit slightly less, but it's still (definitely) worth your time to read over this article and make a decision that you feel good about. Remember, nothing is faster than RAM. Not even an SSD.
If your server doesn't have much RAM, no. You need a server that has enough extra RAM to hold your entire site (the cached version) in memory. How much RAM exactly? We suggest no less than 128MB, but this will depend entirely on the overall size of your site; e.g., how many Posts/Pages you have. If you have only a few, a measly 5MB could do just fine 🙂
How will RAM make Comet Cache even faster?
It will remove disk I/O (i.e., writes/reads) from the caching equation altogether. Thus, it can dramatically improve the amount of time that it takes Comet Cache to do its thing. Keep in mind that Comet Cache is already very fast, and it's certainly much faster than WordPress with all of your plugins. However, if there is something more (and easy) that you can do to make cache reads/writes more efficient, you should. This can go a long way toward improving performance and the health of your server.
See: WordPress Dashboard → Comet Cache → Cache Directory
Understanding Disk I/O (Input/Output = Writes/Reads)
The first time each page of your site is viewed by a visitor, what appears in the browser is cached; i.e., a file is written to the cache directory that you've told Comet Cache to use. By default, Comet Cache stores your cache files in a traditional file system. So there is disk input. Cache files are written in this phase.
To see for yourself, log in to your site via FTP and navigate to: /wp-content/cache/comet-cache. You will find many cache files in this directory. This is where Comet Cache stores the work that WordPress, your theme, and each of your plugins have already done.
Once a page is cached, when a new visitor comes along, and a previously cached file can be served, it is! This saves your server from performing additional DB queries, processing many thousands of lines of code behind-the-scenes, and it avoids the loading of themes/plugins too. The page is already cached. Comet Cache just serves that back out. Easy peasy. Whenever this occurs, Comet Cache simply reads from your configured cache directory and spits the content out in a browser. Thus, a lot of disk output occurs during this reading phase.
If your site has a lot of traffic, there will be a lot of disk I/O. In particular, there will be a very large number of disk reads taking place. At least one file is read from disk each time a pageview occurs. That's not necessarily a bad thing. It's much more efficient than MySQL connections and/or regenerating the full content all over again. In other words, we don't want WordPress and your plugins to cycle through the exact same set of subroutines on each and every pageview. So disk I/O is much better than that terrible alternative. However, there is still room for improvement 🙂
RAM Improves Performance
Now that you understand what disk I/O is, you can understand that, ideally, Comet Cache would like to avoid it. RAM to the rescue. If you have enough RAM, you can store the entire site (cached version) in memory, so that disk I/O is completely out of the picture.
Instructions: Put RAM to Good Use
I will walk through the steps needed to eliminate all disk I/O associated with Comet Cache. The objective? To convert the cache directory that you've told Comet Cache to use, into RAM; i.e., to tell your server to use RAM for that directory, instead of reading/writing to the hard drive.
Tip (Have a Backup Plan): Before you do any sort of maintenance and/or fiddle with your server at the command line, a full backup is highly recommended. Please take a moment before you begin to backup your entire WordPress site, including the database. It's always a good idea.
Step 1: A quick review of /dev/shm for Linux
/dev/shm, available in most Linux distros, is used to improve the performance of application software. Generally speaking, IO-intensive tasks that benefit from fast, No-HDD-read/write-space; such as video encoding, gaming, and page caching in WordPress. All of these can benefit from /dev/shm.
Log into your server via SSH and type:
$ df -h /dev/shm # Show stats for this device.

This shows the total amount of shared memory that my server has in /dev/shm: 246MB. By default, many Linux distros set this to exactly 50% of the total RAM available. I am currently using 0% of this RAM.
Note: /dev/shm is also known as tmpfs. You can learn more about it here. In the next steps, we are going to create a new tmpfs partition that is specifically for Comet Cache.
Step 2: Determine Absolute Path to Base Cache Directory
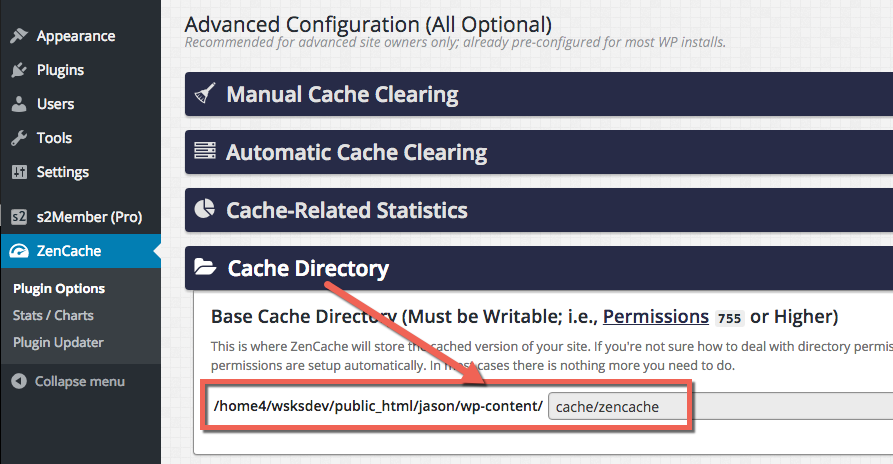
See: WordPress Dashboard → Comet Cache → Cache Directory
This is the base directory for Comet Cache. Inside this directory, Comet Cache will create a few special sub-directories and store all of the work that WordPress, your theme, and plugins have already done. So this parent folder (full absolute path) is what Comet Cache uses to store all cache types.
My base cache directory for Comet Cache is:
/home4/wsksdev/public_html/jason/wp-content/cache/comet-cache
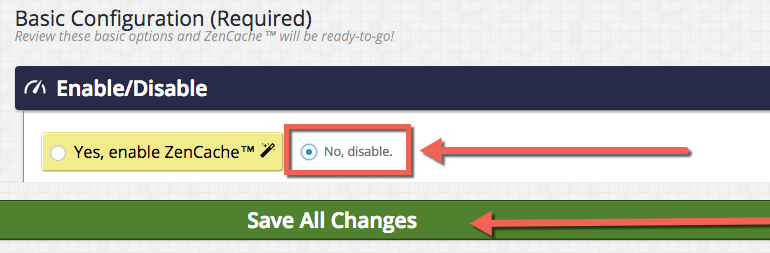
Step 3: Disable Comet Cache Temporarily
Step 4: Partition Shared Memory (tmpfs) for Comet Cache
From the command line, log in to your server via SSH; e.g., $ ssh mysite.com. Once you're logged into your remote server, run the following commands to complete this step. Be sure to press "Enter" after you type each command; i.e., at the end of each line that is terminated by a ; semicolon.
Gain root privileges.
$ sudo -i;
Define your base Comet Cache directory.
Be sure to change this to the base directory for your site.
See: WordPress Dashboard → Comet Cache → Cache Directory
$ comet_cache_base_dir="/home4/wsksdev/public_html/jason/wp-content/cache/comet-cache";
# NOTE: This is just a temporary variable. It will die once you exit SSH.
# Temporary, because we only need it for the purpose of completing this step.
Define the /cache sub-directory.
This is the same for all sites. Comet Cache stores the page cache in a /cache sub-directory. This step is necessary, because we only want to deal with the page cache—nothing else. For instance, the HTML Compressor cache should not be stored in RAM.
$ comet_cache_cache_dir="$comet_cache_base_dir"/cache;
# NOTE: This is just a temporary variable. It will die once you exit SSH.
# Temporary, because we only need it for the purpose of completing this step.
Wipe the cache; i.e., remove directory.
$ rm -rf "$comet_cache_cache_dir";
Recreate the cache directory to start fresh.
$ mkdir -p "$comet_cache_cache_dir";
Configure RAM-based tmpfs partition.
$ echo "tmpfs $comet_cache_cache_dir tmpfs defaults,size=128M 0 0" >> /etc/fstab;
↑ The above creates a new line in your /etc/fstab file. Be sure to change 128M to the number of megabytes that you want to give Comet Cache. Before you decide how much to allocate, it's a good idea to estimate the total RAM that your site needs, plus a little extra just in case.
You can get a rough estimate by multiplying the total number of Posts/Pages that you have by 0.5. That's being very generous, by assuming that each Post/Page on your site is something like 512kbs in total HTML markup size. Remember, each category/tag/archive view may consume additional RAM. That's why it's important to be generous here. You don't want Comet Cache to run out of RAM.
e.g., 200 posts/pages * 0.5 = 100MB
Tip: You could choose to use a percentage. Instead of 128M, you could use 50% to state that you will allocate 50% of total available RAM to Comet Cache. This way if you start running out of RAM, you can simply ask your host to bump you up, and no further configuration changes are needed.
Mount the RAM-based partition.
This reads the details you just supplied and mounts the partition accordingly.
$ mount -a;
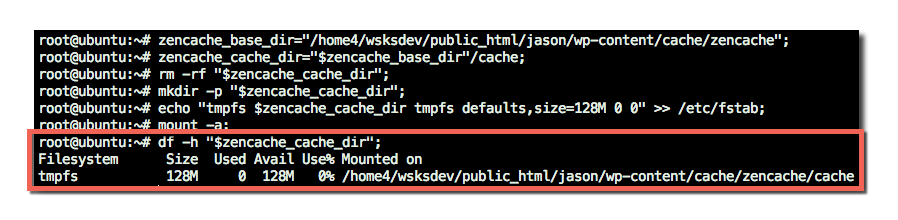
Check statistics; i.e., a quick review of what you just accomplished.
$ df -h "$comet_cache_cache_dir"; # Show stats for this new tmpfs.
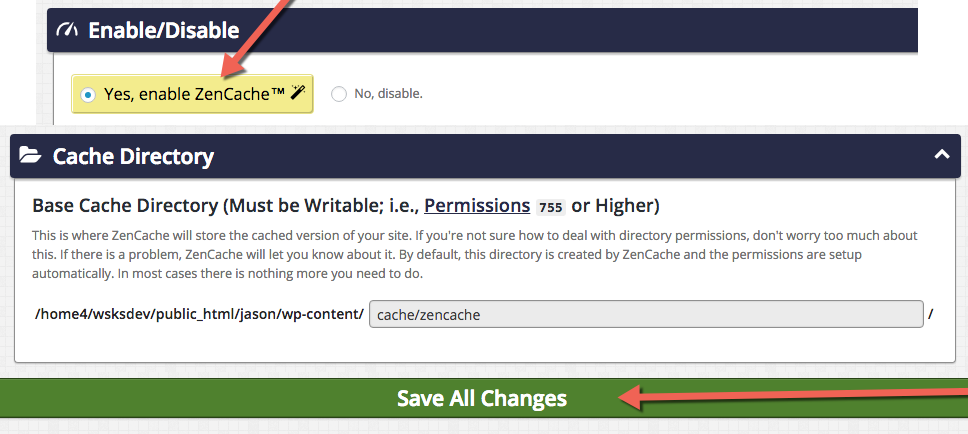
Step 5: Re-enable Comet Cache
Your cache directory is now backed by RAM 🙂
How do I know it's working?
Once you've re-enabled Comet Cache, give it a few minutes (or a few hours, depending on how much traffic you receive), and then check statistics again. You should see that your new RAM-based partition is beginning to fill-up with cache files; i.e., cached pages stored by Comet Cache.
$ df -h "$comet_cache_cache_dir"; # Show stats for this new tmpfs.

Note: If you're checking stats after a previous session ended, the temporary $comet_cache_cache_dir variable may no longer exist. That's fine. However, to check stats you will need to run the command with the full path instead of the variable.
df -h /home4/wsksdev/public_html/jason/wp-content/cache/comet-cache/cache;
# Change the directory path to your own Comet Cache cache directory.