Feb, 2016
How do I know if Comet Cache is working?
Table of Contents
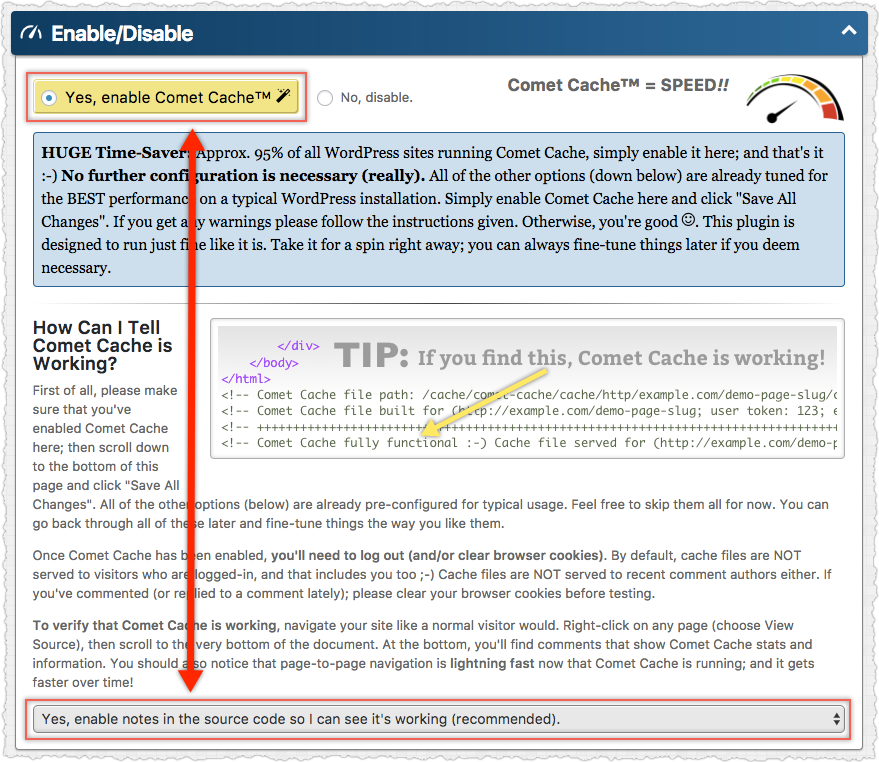
Comet Cache will add "HTML Notes" to the bottom of every page when it Comet Cache enabled and you have the HTML Notes option enabled (enabled by default). To verify that Comet Cache is enabled and the HTML Notes option is turned on, visit Comet Cache → Plugin Options → Enable/Disable:
Once you have verified that Comet Cache is enabled and the HTML Notes option is turned on, you can logout of WordPress (caching is disabled for logged-in users by default, so you'll need to logout) and then visit the home page of your site and choose the "View Source" option in your browser:
- Internet Explorer: View → Source
- Google Chrome: View → Developer → View Source
- Mozilla Firefox: Tools → Web Developer → Page Source
- Apple Safari: Visit Safari → Preferences → Advanced and enable "Show Developer menu in menu bar". Then you can visit Developer → Show Page Source
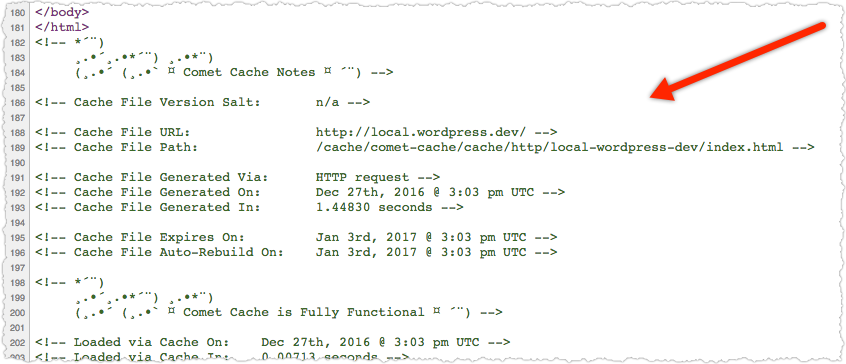
You'll want to scroll all the way to the bottom of the source and look for the HTML Notes added by Comet Cache. They should look something like this:
If you see "Comet Cache fully functional", then you know Comet Cache is enabled and working properly.
What if I just see blank lines at the bottom?
If you don't see any HTML Notes added by Comet Cache but you do see several empty lines where you'd expect to the see the notes, then you could have another plugin or another service stripping out HTML Notes from your site. CloudFlare is known to do this when the "Minify" option is enabled, for example.
This does not mean that Comet Cache isn't working. It just means that the HTML Notes that Comet Cache adds for informational purposes are being stripped out. If you want to verify that Comet Cache is actually working, you can temporarily disable any other "HTML Compression" or "Minify" options that you're running.
Note: If you're using Comet Cache Pro with the HTML Compression option, Comet Cache will not strip out its own HTML Notes.
Comet Cache is enabled but not working!
If Comet Cache is enabled but does not appear to be working, here are a few things you can check:
- Try clicking the "Restore" button inside the Comet Cache options to reset the Comet Cache configuration. Note that this restores all of the default options, so if you have customized your Comet Cache configuration you should back it up before doing this (if you have Comet Cache Pro, you can backup your options in Comet Cache → Plugin Options → Import/Export Options).
- Make sure there are no other WordPress caching plugins enabled. Only one WordPress caching plugin can be running at a time.
- Check your
.htaccessfile for code that may have been added by other caching plugins. Some caching plugins, such as WP Super Cache and W3TC do not "clean up" after themselves when uninstalled and will leave behind code inside the.htaccessfile that can cause issues if you try using another caching plugin. - The
wp-config.phpfile should have a line at the top that saysdefine('WP_CACHE', TRUE);--there should be no other lines that mentionWP_CACHEinside thewp-config.phpfile, only that one line at the top, right below<?php. This is what enables caching on a WordPress site. IfWP_CACHEis set to true, then WordPress will load the caching system defined inside thewp-content/advanced-cache.phpfile (see next point). - The
wp-content/advanced-cache.phpfile should contain PHP code that mentions Comet Cache at the top of the file. This is the file that all WordPress caching plugins use to "hook into" WordPress, so if you installed another caching plugin on your site theadvanced-cache.phpfile may be missing, corrupt, or contain code from another caching plugin. Comet Cache tries to ensure this cache file exists and contains the right content, but in some scenarios it may be necessary to deactivate Comet Cache, delete theadvanced-cache.phpfile, and then reactivate Comet Cache so that it can reinstall the file with the correct code inside.


